Screen Printing
Part 2
Many moons ago some of the RDC Crew went to the local university and asked if we could use their facilities to do a demo on the finer techniques of the screen printing. We finally got round to putting words and images together, here's how it went...
Many moons ago some of the RDC Crew went to the local university and asked if we could use their facilities to do a demo on the finer techniques of the screen printing. We finally got round to putting words and images together, here's how it went...
How the Hell... Screen Printing
We recon the first thing you need to consider is your clothing, you're
gonna get splattered with paint so get into your paint pants. Notice
Tempora's wearing his usual street trash (in pics below); we all have
trash threads and Tempora is no exception with unwashed, paint slashed,
tops, bottoms and skate shoes that have seen more filth than the Playboy
Mansion... or summit like that!
Pin down the screen onto the carousel/hand bench using frame and clips then...Line up your screen with your paper and tape down some measured edge lines ready for a numbered run of prints. This is to keep your artwork more precise and accurate throughout the numbered run of prints. Choose the colour you wish to print with (this could be more than one colour)
.
.
To print more than one layer use more than one screen and follow the steps with each stencil you have created.
Get your ink ready; We use Daler Rowney System 3 Acrylic mixed with screen-printing extender for paper. Place into a pot (About 3 quarters extender and 1 quarter acrylic) and your ready to start printing.
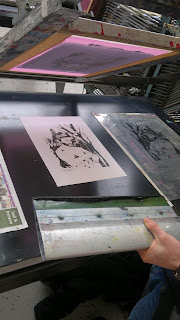
Spread your ink in a line across the bottom of your screen and spread across the stencil using your squeegee (Square blade). Place your screen down using the carousel/hand bench so it is on top of the paper. For best quality choose your paper carefully!
We recommend Somerset satin paper.
We recommend Somerset satin paper.
On the carousel/hand bench if possible turn on your vacuum.
Using the squeegee drag the ink firmly across the screen letting the ink seep through the stencil and on to the paper.
Using the squeegee drag the ink firmly across the screen letting the ink seep through the stencil and on to the paper.
Lift up the screen and check your print.
Using your measured guides you can replace the paper with a fresh piece and your ready to print again.
Using your measured guides you can replace the paper with a fresh piece and your ready to print again.
Place your prints safe in a drying rack and wait for the ink to dry.
Once finished with your screen make you coat your screen (both sides) with screen stencil remover. Leave for a few seconds and jet wash off the emulsion. Leave to dry in the drying unit.
Job Done!!
Making an Exposure Unit... HERE
Look at our RDC Archive page for the review of an ace screen print book called 'Pulled'... Here
Look at our RDC Archive page for the review of an ace screen print book called 'Pulled'... Here
If you are interested in purchasing one of Tempora's exclusive screen prints, get in touch at:
the raddadcollective@gmail.com
Many thanks to the University of Derby, UK for the use of their equipment.
For the Part 1 of 'How the Hell' go... HERE


No comments:
Post a Comment